REAL ESTATE PHOTOGRAPHY
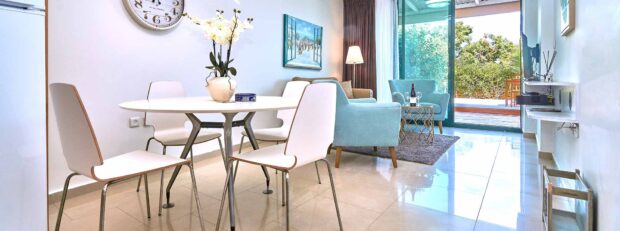
Here’s a basic a guide to real estate photography – how to produce flattering pictures of interiors that have a bright and spacious appearance.
Camera and Settings
For good real estate photography it’s best to use a dSLR (digital SLR) camera with a dedicated hotshoe flashgun. You also need a good quality wide-angle F2.8 zoom lens. I use an APS-C (“half frame”) camera with an 11-16mm or 10-20mm lens.
Set the camera to Manual mode and to record Raw files.
Set the ISO to auto, and the maximum ISO to 1600.
Why use Raw files?
Jpegs compress the image and discard lot of highlight and shadow detail. It’s best to record with Raw files because they retain more detail that’s essential to improve the images in post production.
Before using the camera…
Don’t just take out your camera and start shooting immediately. Look around each room to establish the most attractive angles to shoot from.
You need to make every room look spacious by standing as far back as possible – you’ll often need to shoot with your back up against the wall or jam yourself into a far corner.
Make sure all room lighting is switched on. Side lights and table lamps usually look best if switched on too.
The main living area needs to be shot from a few different positions and requires the most work as all clutter will have to be moved out of each shot.
The kitchen will have to be tidied and shot from different angles.
Tty to shoot the master bedroom from two different positions if possible. Take care that the bedding is smoothed and that any pillows or cushions are attractively arranged.
Close the toilet seat lid in the bathroom.
Using the Camera
I suggest using the camera in Manual mode.
Set the lens to about 2 stops lower than its maximum aperture, to about F5.6 or F8. This gives the sharpest results and greatest depth of field so that all parts of the picture will be in focus. But in darker interiors you may have to open the aperture up to its widest F2.8 aperture.
Most interior shots look best using a flashgun mounted on the camera (but see the Flashgun section). Even when using flash you’ll probably be using quite slow shutter speeds. Modern cameras ofter have “In Body Image Stabilisation” (IBIS) and lenses with Optical Image stabilisation. Even so, be sure to hold the camera as steady as possible. You’ll often need to use slowish shutter speeds of around 1/30sec. So always take at least three identical shots, focussing separately for each one. That way you are more likely to have at least one sharp shot for each view of the room.
Personally I don’t use a tripod because it’s impractical: To make the rooms look as spacious as possible means shooting while I’m backed into a corner, or pressed up agains a wall to get the widest view possible.
Shooting in manual mode requires you to set the exposure yourself. This is really simple, just set the exposure to the middle (or zero point) on the scale displayed in the viewfinder. Do this by altering the shutter speed, the aperture, or both. It will then look something like this…

A useful trick when taking shots that include very bright highlights (such as windows, glass doors, etc) is to underexpose by at least a stop. This helps to record more detail in the brightest areas. Setting under exposure looks something like this…

In post production software a highlight slider can be used to pull back detail in the brightest areas. The rest of the shot, which will look too dark and underexposed, can easily be brightened up using a shadow slider. See the example at the end of this article.
Since the ISO is set to Auto, it will take care of itself. The maximum ISO is set to 1600 because higher ISOs can make pictures look too grainy and unsharp.
Focus and recompose
Set the Autofocus to “Single Point (or single Area) Autofocus” as you have to be able to choose exactly where to focus: If there is an important feature in the foreground you will have to focus on it, otherwise it’s general best to focus on a feature that is one third into the depth of the room. This is an old trick that helps to maximise the depth of field and keep everything in focus.
After placing the focussing point at the correct spot you half-press the shutter button to lock the focus. Keeping light pressure on the shutter button you can recompose to get the best composition, then fully press it to take the picture.
Repeat this “focus and recompose” technique to take two more identical shots: You will then have three copies of each view of the room, and can be sure that you’ll have at least one well-composed, sharp and accurately focussed image.
Don’t take every shot with the camera at eye level while standing. Sometimes a view will look better if you crouch down and shoot from a lower position. Shots taken from a higher position, such as standing on a chair, are not generally used as the exaggerated perspective they produce looks too distorted for real estate. If you’re not sure which position looks best, take three shots from a standing position and three shots from a lower position. You can choose which is best later during post production.
Flashgun
When used properly flash improves the look of almost every interior shot. The flashgun mounted on the cameras hot shoe can be left on its default settings settings, sometimes called “Balanced fill flash”, “BL TTL”, etc. Never point the flash head directly forwards – the light must be diffused by bouncing it off the ceiling. If the width of the beam can be adjusted, leave it on the widest setting – this helps to spread the light more evenly.
If you are taking a shot while standing in the darkest part of the room…
i.e. furthest from the windows or glass doors, point the flash head upwards and tilt it only slightly forwards, perhaps 10 – 15º. This will bounce the light off the ceiling slightly ahead of you and will illuminate both where you are and bleed out into the rest of the room.
This evens out the room lighting and makes the interior more look spacious and bright. It’s also a good idea to deliberately underexpose the shot (see the Manual Mode section and the Post Production Example section) to increase the amount of detail recorded very bright areas, such as windows or glass doors.
If you are taking a shot while standing in the brightest part of the room…
i.e. with the darkest part ahead of you, point the flash head further forwards, but never more than 45º, to bounce the light from the ceiling ahead of you into the darker areas.
Always check the effect of the flash on the preview LCD on the back of the camera (or in the viewfinder of a mirrorless dSLR) and adjust the angle of the flash accordingly.
In confined spaces, such as small bedrooms or bathrooms…
it might be best to point the flash vertically upwards. But there are no rules – if the effect does not look flattering try something else.
Lens
Most interior shots are taken with the widest end of the wide-angle zoom lens. The longer end is used to closer up take shots of details, such as areas of the kitchen.
It’s possible to shoot with wide angle lenses at fairly slow shutter speeds and still get sharp pictures, so you don’t need to use a tripod. But take care to hold the camera very steady and try to use shutter speeds of a 30th of a second or faster. Check the sharpness on the preview screen on the back of the camera by zooming in to 100%.
You can also use the old trick of focussing on any feature that is about one third into the depth of the room. This maximises the depth of field and helps to keep everything in focus.
Don’t forget
Arrange the chairs around a table to be perfectly in line and parallel. Remove distracting details from every shot. Switch on every room light in the room to add some brightness and sparkle. Always make sure the bathroom toilet seat is lowered if it appears in the shot!
Post Production Work
Good real estate photography is very dependent on post production work which can greatly enhance the Raw images from your camera to give them a professional appearance.
Adobe Lightroom is widely used, but is only available by monthly subscription. Affinity Photo is also popular and only costs about $60. I prefer to use Capture One which is expensive to buy, but also available through a monthly subscription plan.
There’s also free software that you can check out. I suggest you try out trials of several Raw file editors before choosing one that suits you. Make sure that it can convert Raw files for the make and model of your camera and has at least all of the features listed below.
To use a raw file editor you first need to import the pictures to the Raw file software. The simplest way is to insert the cameras memory card into your computer (or use a USB card reader). Then you can make a selection of the best images to enhance.
Here are the basic steps to improve the Raw image:
- Correct the verticals – real estate pictures have a much more professional appearance if vertical lines are exactly upright.
- Correct lens distortion – the lens can make straight lines look curved. This is easily corrected using a slider.
- Crop the picture if necessary to remove distracting details or to enhance the composition.
- Restore lost details back into the highlights – often the view out of windows and glass balcony doors looks “blown out” and lacks detail. Use the highlight slider to restore detail to these areas.
- Use the Shadow slider to brighten the darker areas – this brings back detail to the shadows, and evens out the lighting. Interiors that look evenly lit and bright will appear to be more spacious and attractive.
- Fine tune the image by using the contrast, brightness, clarity and saturation sliders are used to fine tune the image.
- Remove distracting details – small distractions can sometimes be removed using the spot removal, healing brush or cloning tools, if the Raw editor has these features.
- Export the finished images. – for use on websites and social media the finished pictures can be saved into a new folder as Jpegs, 80% quality, ICC Profile sRGB, and 2500 pixels on the longest edge. For images to be used in magazines or posters consult the client or the printer.
Example of simple post production
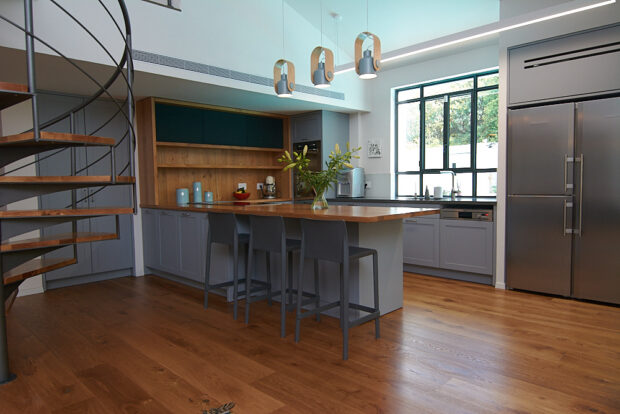
Here’s a Raw file straight out of the camera. I had underexposed it to retain more highlight detail.
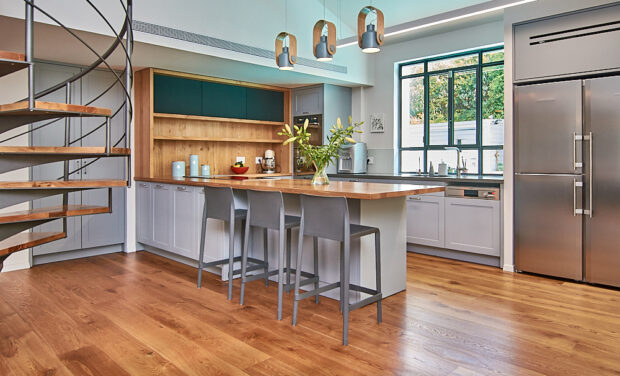
Just a few minutes of moving sliders in a Raw file editor transforms the image into a bright and spacious real estate shot.
P.S.:
With experience you will find you own ways of using the camera and Raw software, so this article is only intended as a brief guide to get you going.
These is a lot more you can do in post production. But for most real estate photography these basic steps will produce good professional results.