RAW FILES
Have you tried shooting in Raw? Digital cameras record pictures as Jpegs by default, but most also offer the option to record your pictures as Raw files. Many enthusiasts and most professional photographers now shoot in Raw because it extends the capabilities of the camera and is the best choice for editing and improving pictures afterwards.
Why use Raw?
Your camera has a range of important settings, such as exposure, contrast, saturation, ISO, sharpness, exposure compensation, noise reduction, etc, that are permanently locked into the image when it is saved as a Jpeg.
Saving pictures as Raw files, however, does not lock these settings into the image: When you open it later you can play around with the all of these settings to optimise the picture, then save it as a final Jpeg (or other file type). Raw files give you more control over the look and quality of your pictures.
This Jpeg picture was taken on a bright day. It lacks detail in both the highlights and the shadows because the camera’s auto Jpeg processing can’t handle such high contrast subjects. It was saved as a Jpeg, so any extra detail detected by the cameras sensor has been lost.
This is the same picture saved as a Raw file. It was trivially easy to open it and restore highlight and shadow detail.
You need special softwareI to open Raw files on your computer. I used Adobe Camera Raw (a free Photoshop plugin) and adjusted the highlight and shadow sliders to restore detail. I made other adjustments to refine the sharpness and colour, etc, before saving it as a Jpeg.
Adobe Lightroom is the most popular program to edit Raw files, especially if you shoot hundreds of images that need to be processed quickly.
Other benefits
Pictures taken at high ISOs can look very grainy and soft. When saved as Jpegs there’s not much you can do to reduce the coarse appearance, but saving them as Raw files gives you control over settings that can help to reduce the grain, enhance sharpness, alter colour balance, contrast, saturation, etc.
If you have to shoot quickly in difficult lighting conditions it’s inevitable that some pictures will be over or under exposed, or the colours won’t be accurate. Raw files definitely retain more information than Jpegs, so you may be able to bring missing detail and colour back into the image.
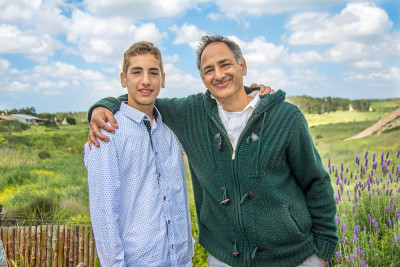
Here’s a detail from the opening shot of this post. Because I shot it in Raw it was easy to adjust the colour balance, and optimise the detail and sharpness:

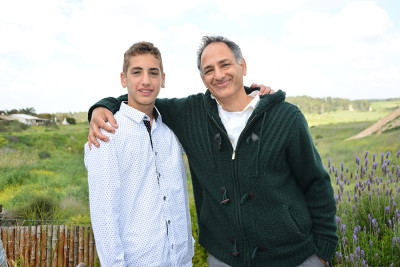
Shot in difficult lighting conditions, this Jpeg file has a strong orange cast. Both colour information and fine details are missing.

Fortunately I had also saved the picture as a Raw file. I could then easily restore the missing colour and detail.
Raw creativity
Snappers will always prefer the instant nature of Jpegs and generally accept whatever comes out of the camera as good enough. Enthusiasts and professional photographers, who work on their images to get the best results, benefit most from using Raw files.
Throughout the history of photography, superb photographs were created that have blown-out highlights, are grainy and not quite sharp, lack shadow detail, etc, etc. So take care not to become too lost in the technicalities of editing. Squeezing the last drop of detail out of the highlights or fussing too much over the sharpness, etc, is pointless unless you can take Good Pictures.
There is absolutely no substitute for raw creativity and raw vision!
Want to know the secrets of taking Good Pictures? Check out these 5 Steps …